
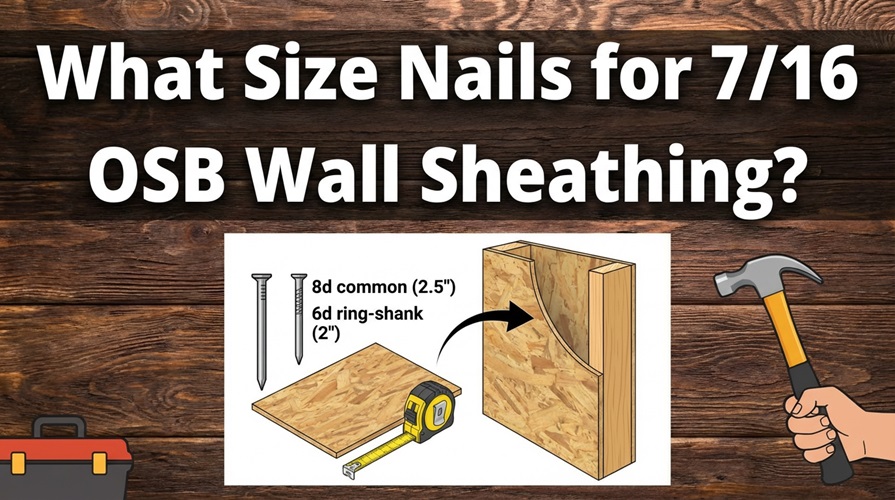
Use 8d common nails for 7/16-inch OSB wall sheathing. These nails measure 2½ inches long and provide the penetration depth required by building codes. Space them 6 inches apart along panel edges and 12 inches apart in the field (intermediate supports).
That’s the short answer. But getting wall sheathing right involves more than just grabbing the right nail box. Improper fastening is one of the most common reasons sheathed walls fail during high winds or seismic events. The difference between a wall that holds and one that peels away often comes down to nail selection and spacing.
I learned this the hard way during my first major renovation. The nailing pattern looked fine to me—until a building inspector pointed out that my fasteners were missing studs in several spots and my edge spacing was inconsistent. Had to pull panels and redo sections.
Here’s everything I’ve learned since then about fastening 7/16 OSB properly.
The Correct Nail Specifications for 7/16 OSB
Building codes specify minimum requirements for structural sheathing attachment. These aren’t suggestions—they’re engineered specifications that determine whether your wall assembly performs as designed.
Standard Requirements for 7/16″ OSB Wall Sheathing:
| Specification | Requirement |
|---|---|
| Nail size | 8d common (2½” × 0.131″ diameter) |
| Edge spacing | 6 inches on center |
| Field spacing | 12 inches on center |
| Edge distance | Minimum ⅜” from panel edge |
| Penetration into framing | Minimum 1½ inches |
Why 8d Common Nails?
The “8d” designation refers to penny size—an old system where the number indicated nail cost per hundred. What matters today is the actual dimensions:
- Length: 2½ inches
- Shank diameter: 0.131 inches
- Head diameter: Approximately 9/32 inch
This combination provides adequate penetration through the ⁷⁄₁₆-inch sheathing (0.4375 inches) while leaving sufficient length to anchor firmly in the framing member beneath.
The Math Behind It:
- OSB thickness: 0.4375″
- Required penetration: 1.5″ minimum
- Total nail length needed: 1.9375″ minimum
- 8d common nail length: 2.5″
- Actual penetration achieved: 2.0625″
That extra penetration margin accounts for imperfect contact, slight gaps, and the reality that not every nail drives perfectly flush.
Alternative Fastener Options
While 8d common nails remain the standard, other fasteners work for 7/16 OSB sheathing under specific conditions.
Acceptable Alternatives:
| Fastener Type | Size | When to Use |
|---|---|---|
| 8d common nail | 2½” × 0.131″ | Standard application (most common) |
| 6d common nail | 2″ × 0.113″ | Allowed by some codes for ⁷⁄₁₆” panels |
| 8d ring-shank nail | 2½” × 0.131″ | Higher withdrawal resistance needed |
| 8d box nail | 2½” × 0.113″ | Thinner shank, reduces splitting |
| #6 wood screw | 2″ minimum | Where codes permit, slower but stronger |
Ring-Shank vs. Smooth Shank:
Ring-shank nails grip better once driven—their ridged surface creates mechanical resistance against withdrawal. For wall sheathing in high-wind zones or seismic areas, ring-shank fasteners often make sense even when not required.
The tradeoff? They’re harder to remove if you make mistakes. Once a ring-shank nail is set, you’re either pulling it through the panel face or prying up the entire sheet.
Pneumatic Nailer Considerations:
Most production framing uses pneumatic nailers loaded with collated nails. These nails typically have:
- Slightly smaller shank diameters (often 0.120″ vs. 0.131″)
- Clipped or offset heads (to allow magazine stacking)
- Different material compositions
If using pneumatic nails, verify they meet the minimum specifications for your jurisdiction. Some codes require full-head nails for shear walls, which means hand-nailing or using full-round-head pneumatic nailers.
Spacing Patterns That Actually Work
Getting nails in the right places matters as much as using the right size.
Standard Nailing Pattern:
textPanel Edge: Every 6 inches
           ↓
    ○──6"──○──6"──○──6"──○──6"──○
    │                            │
    ○         Field Area         ○
    │     (every 12 inches       │
    ○      at intermediate       ○
    │         supports)          │
    ○                            ○
    │                            │
    ○──6"──○──6"──○──6"──○──6"──○
Edge vs. Field Distinction:
- Edges: The perimeter of each panel, plus any panel edge that lands on a framing member
- Field: The interior portion of the panel where intermediate studs pass behind
Why Edges Need Closer Spacing:
Panel edges are structural weak points. Under lateral loads (wind, seismic forces), shear stress concentrates at fastener locations along edges. Closer spacing distributes these forces across more connection points, reducing the load on each individual nail.
The 6-inch edge spacing isn’t arbitrary—it’s calculated based on the shear capacity of the OSB, the nail shear strength, and the expected lateral loads on typical wall assemblies.
Critical Installation Details
Proper technique prevents the problems that proper nail selection alone can’t solve.
Edge Distance Matters
Keep nails at least ⅜ inch from panel edges. Closer placement risks:
- Edge blowout during nailing
- Reduced holding strength
- Panel cracking under load
Some builders mark a line ⅜ inch from edges before nailing. Others develop the muscle memory to judge it visually. Either approach works—just stay consistent.
Avoid the Common Spacing Errors
The most frequent mistakes I see on job sites:
- Inconsistent edge spacing — Starting at 6 inches but drifting to 8 or 10 inches mid-panel
- Missing intermediate studs — Nails that land between studs provide zero structural value
- Overdriving — Nail heads sunk below the panel surface reduce holding capacity
- Underdriving — Proud nail heads prevent siding installation and create bump-through
Sequencing Your Nails
Start at one corner and work systematically. Many carpenters:
- Tack the panel in place with four corner nails
- Verify alignment and adjust as needed
- Complete one edge entirely
- Complete the opposite edge
- Fill in field nailing
- Double-check for any missed locations
This sequence prevents the panel from shifting during fastening and ensures you don’t end up with gaps at corners.
Shear Wall Requirements: When 6″ and 12″ Isn’t Enough
Standard stud walls use the 6″/12″ pattern. But designated shear walls—sections engineered to resist lateral forces—often require tighter spacing.
Common Shear Wall Nailing Schedules:
| Application | Edge Spacing | Field Spacing |
|---|---|---|
| Standard wall sheathing | 6″ | 12″ |
| Basic shear wall | 6″ | 12″ |
| High-capacity shear wall | 4″ | 12″ |
| Maximum capacity | 3″ | 12″ |
| Seismic/hurricane zones | Per engineer | Per engineer |
How to Know What You Need:
Your structural plans should specify nailing schedules for any designated shear walls. These aren’t areas to guess on—the entire lateral force resistance system depends on proper fastening.
If you’re working without engineered plans (not recommended for anything structural), local building codes establish minimum requirements based on:
- Geographic location (wind and seismic zones)
- Building height and configuration
- Wall length and opening placement
When in doubt, consult your local building department or a structural engineer.
OSB Panel Installation Best Practices
Beyond nailing, several installation factors affect how your sheathing performs.
Panel Orientation
Install OSB panels vertically (long dimension parallel to studs) or horizontally depending on:
- Stud spacing
- Required shear values
- Local code requirements
Vertical installation works well for standard 8-foot walls with 16-inch stud spacing. Horizontal installation often makes sense for taller walls or when bridging more framing members provides structural benefit.
Gap Requirements
OSB expands when it absorbs moisture. Leave ⅛-inch gaps:
- Between adjacent panel edges
- At panel ends
- Where panels meet other materials
These gaps prevent buckling when panels expand. Some OSB products come with pre-marked spacing guides. If not, use a standard 8d nail as a gap spacer—the shaft diameter provides approximately the right clearance.
Handling Moisture
OSB is more moisture-sensitive than plywood. The strand orientation and resin bonding create layers that can swell, particularly at exposed edges.
Protect your investment:
- Store panels flat, elevated off ground
- Cover with tarps that allow airflow
- Install weather-resistive barrier promptly after sheathing
- Never leave cut edges exposed to weather for extended periods
Troubleshooting Common Problems
Even experienced builders encounter issues. Here’s how to address the most frequent ones.
Problem: Nails Missing Framing
Nails between studs provide no structural value. If you notice misses:
- Add additional nails at correct locations
- Don’t remove the missed nails (they’re not hurting anything)
- Consider why misses occurred—worn chalk lines? Working too fast?
Problem: Overdriven Nails
Pneumatic nailers make this easy to do. Heads more than ¹⁄₁₆ inch below the panel surface significantly reduce holding power.
For overdriven nails:
- Add a properly driven nail within 2 inches of each overdriven fastener
- Adjust nailer pressure or depth setting
- Consider switching to hand nailing for critical connections
Problem: Splitting at Edges
OSB can split when nails land too close to edges or when the panel has absorbed moisture.
Solutions:
- Pre-drill near edges (time-consuming but effective)
- Use box nails instead of common (thinner shank)
- Check panel moisture content before installation
- Increase edge distance slightly (but stay on the framing)
Problem: Panels Not Lying Flat
Bowed or warped panels create gaps against framing, reducing nail holding power.
Solutions:
- Install with bow facing outward (nailing flattens it)
- Use additional fasteners in problematic areas
- Replace severely warped panels
- Store panels properly to prevent future warping
Code Compliance: What Inspectors Look For
Building inspectors focus on specific elements when checking sheathing installation.
Inspection Checklist:
✓ Correct fastener size — 8d common or approved alternative
✓ Proper spacing — 6″ edges, 12″ field (or tighter per plans)
✓ Adequate edge distance — Minimum ⅜”
✓ Full penetration — Nails driven flush, not overdriven or proud
✓ Fasteners hitting framing — No misses in pattern
✓ Panel gaps — ⅛” spacing maintained
✓ Shear wall compliance — Tighter schedules where specified
✓ Blocking at joints — Horizontal joints backed by blocking
Documentation That Helps:
Keep on hand:
- Product specification sheets for OSB panels
- Nail/fastener specifications
- Structural plans showing nailing schedules
- Code references for your jurisdiction
When inspectors see organized documentation, they know you’ve done your homework.
Quick Reference Charts
Print these for job site reference.
Nail Size by OSB Thickness:
| OSB Thickness | Minimum Nail | Recommended |
|---|---|---|
| ⁷⁄₁₆” (7/16″) | 6d common | 8d common |
| ½” (1/2″) | 8d common | 8d common |
| ⁵⁄₈” (5/8″) | 8d common | 10d common |
| ¾” (3/4″) | 10d common | 10d common |
Standard Spacing Requirements:
| Location | Spacing |
|---|---|
| Panel edges (perimeter) | 6″ o.c. |
| Panel edges (at studs) | 6″ o.c. |
| Field (intermediate studs) | 12″ o.c. |
| Blocking at horizontal joints | 6″ o.c. |
Nail Dimensions Reference:
| Nail Size | Length | Diameter |
|---|---|---|
| 6d common | 2″ | 0.113″ |
| 8d common | 2½” | 0.131″ |
| 10d common | 3″ | 0.148″ |
| 16d common | 3½” | 0.162″ |
Frequently Asked Questions
Can I use screws instead of nails for OSB sheathing?
Yes, with conditions. Screws must meet minimum length and diameter requirements—typically #6 or larger, 2 inches minimum length for 7/16″ OSB. Some codes and engineers prefer screws for their superior withdrawal resistance. However, screws take longer to install and can over-torque easily, stripping the OSB. For standard applications, nails remain the practical choice. For high-performance or critical shear walls, consult your structural engineer about screw specifications.
What happens if I use 6d nails instead of 8d?
Using 6d common nails on 7/16″ OSB technically meets some code minimums but provides less penetration margin. The 2-inch length leaves approximately 1.56 inches in the framing—just barely over the 1.5-inch minimum. Any imperfect contact, gaps, or alignment issues could drop you below required penetration. For the minimal cost difference, 8d nails provide worthwhile insurance.
How do I know if my nails are hitting the studs?
Sound and feel tell you immediately. Nails hitting solid wood produce a distinct “thunk” and require steady driving force throughout. Nails between studs drive easily with a hollow sound, then stop abruptly when the point hits drywall, insulation, or nothing. Mark stud locations with chalk lines before nailing, verify alignment as you work, and check your pattern periodically by pushing on the sheathing.
Is ring-shank better than smooth-shank for wall sheathing?
Ring-shank nails resist withdrawal forces better—important for sheathing that might experience uplift or outward pressure. For standard wall sheathing in moderate climate zones, smooth-shank 8d nails are typically sufficient and code-compliant. In high-wind regions, seismic zones, or for designated shear walls, ring-shank fasteners provide additional security. They’re also harder to remove if you need to pull panels for any reason.
Should I use galvanized or plain steel nails?
For interior applications where sheathing stays dry, plain steel works fine. For exterior sheathing that might see moisture before siding installation—or in coastal/humid environments—hot-dipped galvanized nails resist corrosion better. Electro-galvanized nails offer some protection but less than hot-dipped. In coastal environments with salt air, consider stainless steel for critical connections.
What’s the maximum gap between OSB panels?
Standard recommendation is ⅛ inch. This gap allows for thermal and moisture expansion without buckling. Gaps larger than ¼ inch may require blocking or clips to support panel edges, depending on application and load requirements. Very large gaps indicate cutting or measurement errors that should be corrected.
Can I install OSB sheathing in rain?
OSB tolerates brief moisture exposure, but extended wetting causes swelling—particularly at panel edges. If rain is imminent, prioritize getting weather-resistive barrier installed over completed sheathing. If panels get wet, allow complete drying before installing WRB. Standing water on horizontal OSB surfaces (like roof sheathing) causes more damage than vertical wall sheathing that sheds water. When possible, schedule sheathing installation during dry weather windows.
Key Takeaways
Getting 7/16 OSB wall sheathing right comes down to a few fundamentals:
Use the right fasteners. 8d common nails (2½” × 0.131″) provide the length and diameter needed for proper structural connection. Don’t substitute smaller fasteners to save money.
Follow the spacing pattern. 6 inches at edges, 12 inches in the field. Tighter schedules where specified on structural plans. Consistent execution matters more than speed.
Pay attention to details. Edge distance, penetration depth, avoiding overdriving, hitting framing members—these “small” things determine whether your sheathing performs as designed.
Know when requirements change. Shear walls, high-wind zones, and seismic regions often demand tighter spacing or specific fastener types. Verify requirements for your specific application.
The goal isn’t just passing inspection. It’s building walls that perform for decades—through storms, earthquakes, and the stresses of daily life. Proper nailing is invisible once the siding goes up, but it’s doing critical work every day your building stands.
Take the time to get it right.